As an Amazon Associate, we earn from qualifying purchases. Some links on this site are affiliate links at no extra cost to you. Our recommendations are based on thorough research and editorial judgment.

Electronic Descaler Installation: What You Need to Know Before You Buy
Before you buy an electronic descaler, I’ll verify your plumbing’s compatibility with the unit. You’ll need to check your pipe diameter and household water flow rate, typically between 2–8 gallons per minute. Common residential pipes like copper, PEX, and PVC work well. Gather basic tools—measuring tape, screws, brackets, and a power adapter—then mount the unit on your main water line before the water heater. Testing for leaks and monitoring performance monthly guarantees long-term effectiveness, so understanding these steps upfront prevents costly mistakes.
Key Takeaways
- Verify your pipe diameter (½” to 1″) and flow rate (2–8 GPM) match the descaler’s specifications before purchasing.
- Electronic desaclers work on copper, PEX, and PVC pipes commonly found in residential plumbing systems.
- Installation requires mounting on the main water line before the water heater with at least 20 inches of clearance.
- The unit operates passively via electromagnetic signals and requires no maintenance, only periodic sensor checks every six months.
- Gather mounting brackets, screws, zip ties, power adapter, and measuring tape before installation to ensure smooth setup.
What Is an Electronic Descaler and How It Works
Because limescale buildup can damage your plumbing system and reduce water heater efficiency, understanding how an electronic descaler works helps you protect your home’s water system. An electronic descaler uses electronic principles to generate signals that alter how minerals behave in water. When you wrap coils around your water pipe, the device sends electromagnetic waves through the water, changing mineral crystallization patterns so limescale doesn’t accumulate on pipes and fixtures.
This technology offers significant environmental impact benefits since you’ll avoid harsh chemical descalers that harm ecosystems. The system requires no maintenance and works passively as water flows through your pipes. Installation is straightforward, taking about fifteen minutes without cutting pipes or draining your system.
Verify Your Water Line Compatibility
Now that you understand how electronic desecalers protect your plumbing system through electromagnetic technology, you’ll want to verify that your specific water line will work with this device. Electronic desecalers work effectively on most residential pipe types, including copper, PEX, and PVC, which cover the majority of home plumbing systems.
Before installation, check your pipe diameter, as most units accommodate standard residential sizes ranging from half-inch to one-inch pipes. You should also consider your home’s flow rate, which determines how quickly water moves through your system. Most electronic desecalers function optimally with typical household flow rates between two and eight gallons per minute.
If you’re uncertain about your specific pipe specifications, measure your existing pipes or consult your home’s original plumbing documentation to ensure compatibility before purchasing.
Gather Your Tools and Materials

Before you install your electronic descaler, you’ll want to gather all the necessary tools and materials to make certain the process goes smoothly and efficiently. Check your package contents to verify everything’s included: mounting tape, screws, magnetic plates, brackets, zip ties, and the power adapter. You’ll need safety gloves to protect your hands while handling materials and working near pipes. A measuring tape helps you locate the best installation spot, ensuring you have adequate space on your water line. Additionally, keep a cloth nearby for cleaning any existing limescale from fixtures after installation. Having these items ready beforehand prevents interruptions and allows you to complete the installation without unnecessary delays or complications.
Install Your Descaler in 15 Minutes

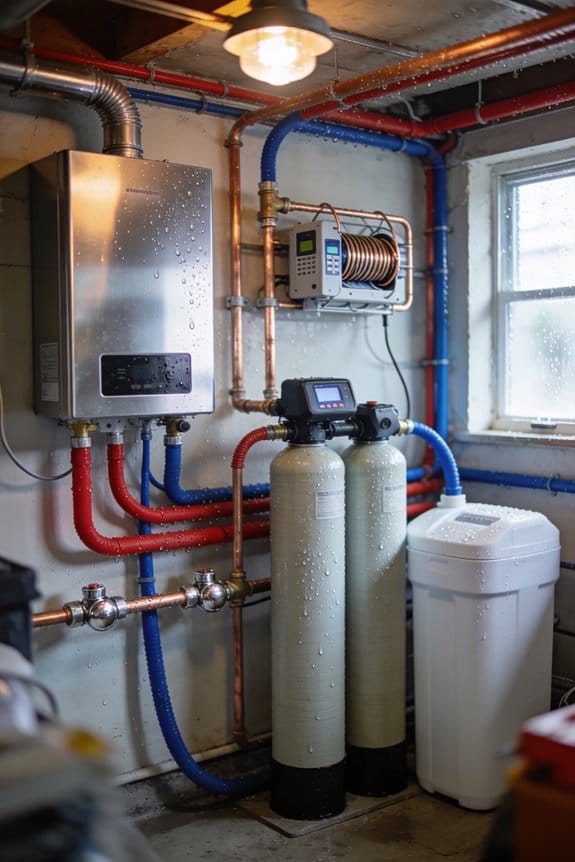
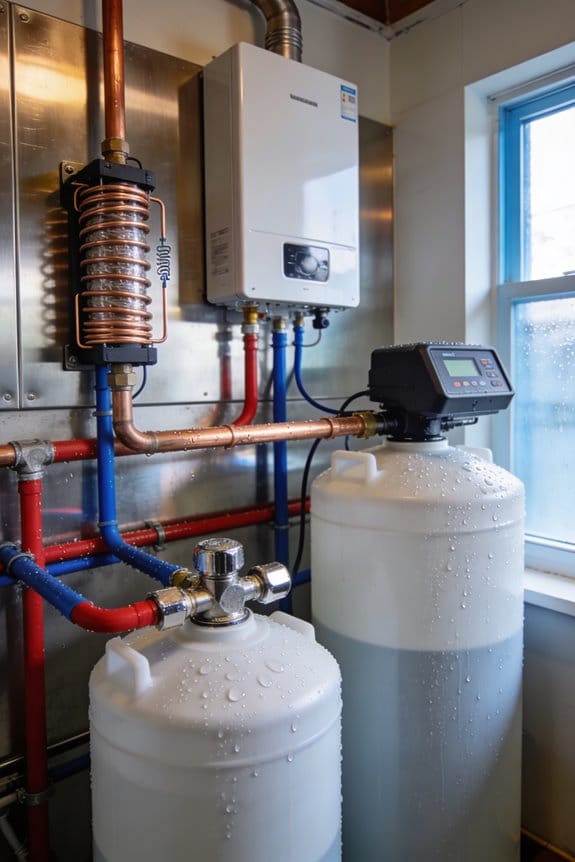
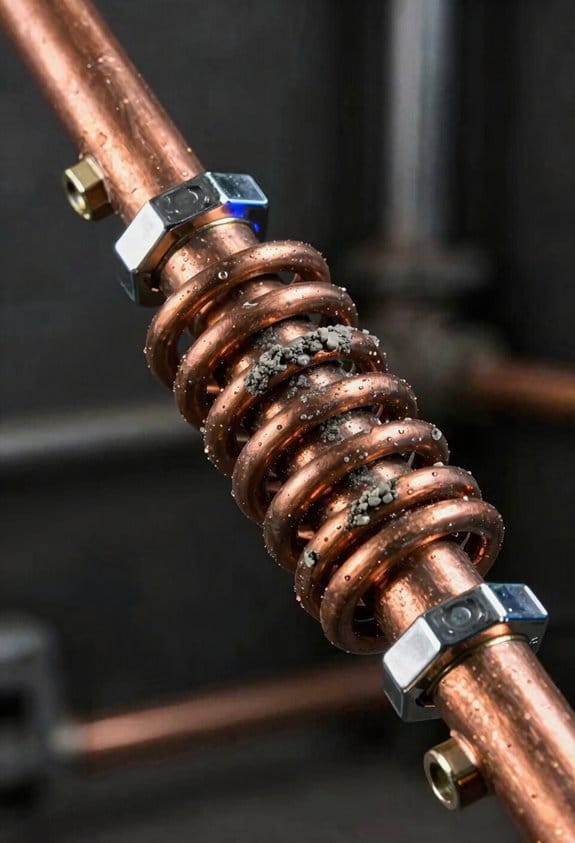
With all your materials gathered and your main water supply turned off, you’re ready to begin the installation process. The quick setup requires selecting an appropriate mounting location on your main water pipeline before the water heater. I recommend choosing a spot that offers at least 20 inches of space optimization, allowing room for the unit and future maintenance access. Mount the descaler using the included brackets and screws, drilling into wall anchors for stability. Next, wrap the brass coil tightly around the water pipe with no gaps, securing both ends with zip ties. Finally, connect the USB adapter to a nearby power source, and you’ll see the solid green indicator light confirming successful installation within 15 minutes.
Best Mounting Locations for Maximum Effectiveness

Once you’ve secured the descaler unit in place, I’d recommend giving careful thought to where exactly that mounting location sits within your home’s plumbing system. The ideal spot is on your main water pipeline before it reaches your water heater, which protects your entire plumbing system from limescale buildup. For wall mounting, choose an indoor location like your garage or utility room where weather won’t damage the equipment. Position the unit near your main water supply entry point, ensuring at least 20 inches of available space. Consider ceiling proximity if it offers better access to your main line. Select a spot close to a power source and easy to reach for future maintenance checks.
Connect Power and Activate Your Unit
Now that your descaler unit is mounted securely in place, you’ll need to connect it to a power source to activate its water-softening function. Insert the USB connector from the brass strap into the unit’s port, then plug the included adapter into a nearby outlet. The adapter typically provides 12V DC power, which is standard for these systems.
When you’ve made the connection, look for a solid green light on the power indicator—this confirms proper power cycling and successful activation. Simultaneously, you should see a blue flashing light on the coil, signaling active operation. If you don’t observe these lights, try power cycling the unit by disconnecting and reconnecting it. This basic indicator troubleshooting often resolves minor issues. Once both lights appear correctly, your descaler is ready to function.
Test for Leaks and Verify Water Flow
After your descaler unit is powered and operational, you’ll want to verify that everything is working correctly by testing for leaks and checking water flow throughout your system. Start by slowly turning your main water supply back on, observing all connection points carefully for any drips or moisture. Next, perform pressure testing by checking faucets throughout your home to confirm water flows normally without reduced pressure. Run water through multiple taps simultaneously for flow verification, confirming the descaler isn’t restricting water movement through your pipes. If you notice any leaks at joints or connections, turn off the water immediately and tighten those areas. Once you’ve confirmed normal operation with no leaks and consistent water pressure, your installation is complete and functioning properly.
Monitor Your System’s Long-Term Performance
Because your electronic descaler works continuously to prevent limescale buildup, establishing a monitoring routine helps you track its effectiveness and catch any potential issues early. I recommend keeping a usage logging system to document water quality changes you notice around your home. Check faucet screens and showerheads monthly for reduced mineral deposits, which indicates successful performance tracking. Observe your water clarity and any changes in taste, as these reflect overall system health. Schedule sensor maintenance checks every six months to guarantee peak function. If you notice decreased performance, verify the power indicator still glows solid green and coil light flashes blue. Most systems require no ongoing maintenance, yet regular observation guarantees your descaler continues protecting your plumbing system effectively.
Frequently Asked Questions
Can I Install an Electronic Descaler on My Existing Plumbing Without Cutting Pipes?
You absolutely can—I’ve seen homeowners avoid costly plumber bills by choosing pipe-free options. Clamp-on units wrap around existing pipes with zero cutting required, securing via zip ties for easy removal and reinstallation anytime.
What Iron Levels Are Optimal for Electronic Descaler Effectiveness and Performance?
I’d recommend checking your water’s iron concentration levels—lower iron enhances descaler effectiveness. You’ll also want to test your water alkalinity, as this affects performance. I suggest getting your water tested before installation.
How Quickly Will I Notice Improvements in Limescale Buildup After Installation?
You’ll notice improvements within weeks as limescale buildup begins reducing. I’d say immediate perception of change takes a bit longer, but you’ll definitely see long term change in your fixtures and pipes over time.
Does the Descaler Work Equally Well on All Pipe Materials and Sizes?
Like water finding its path through any channel, I’ll tell you it works on all pipe materials—PEX, PVC, copper—adapting beautifully. Pipe composition doesn’t matter; flow dynamics remain consistent, so size variation won’t affect performance either.
Is Professional Installation Required or Can Homeowners Install This Themselves Easily?
You can absolutely install this yourself—no professional needed. I’ve designed it for easy DIY installation in about 15 minutes. Check your warranty implications beforehand, as DIY concerns typically don’t affect coverage when you follow instructions properly.